


With Google Tag Manager, marketing executives are no longer at the whim of developers.

The purpose of this guide is to demystify Google Tag Manager to track their marketing goals more efficiently and change their website without getting the IT department involved.
What is Google tag manager?
Google tag manager is a free console provided by Google which allows you to update a website’s tags, add new tags and optimise your online marketing all in one place with just a few clicks. It’s a bit like a dashboard which enables you to see every click on your website. It works together with Google Analytics so that the data you get in your GA is enhanced. It can integrate with things like AdWords or DoubleClick as well, for example.
This means for marketing managers it’s easier to see where their, or their clients’ money is being spent. Because of more complex methods of promotion and attribution, Google Analytics isn’t enough on its own. If you have an affiliate marketing program, you’ll need to install a conversion pixel or a script, and for retargeting you need multiple code snippets from several different sources, and Google Tag Manager simplifies this.
What’s a tag and how does it work?
Simply put, a tag is a piece of code that is added to the head or body element of your website to enable more effective tracking. A tag enables information to be sent to a third party site, like Google Analytics.
All of this code is added to something called a ‘container’. With Google Tag Manager, you’ll have one individual container per website, domain or mobile app, which has as many different tags in as you need, instead of having several snippets of code to add to your website.
A tag needs to be ‘fired’ in order to get it to complete an action. You get to decide which conditions will make the tag fire - for example, if someone clicks somewhere on your site (useful if you have Google Analytics), or when someone signs up to your newsletter. You can control when the tag shouldn’t fire either. In fact, you have control over when the tag fires, where it should fire,when the tag shouldn’t fire, where the tag shouldn’t fire, and what the tag should do when it actually fires.
Why should you use Google Tag Manager?
You don’t need a webmaster to make changes for you
Because you don’t need to change the code for a website if you’re using Google Tag Manager, you don’t need to use a webmaster to update it for you, which can save you time and money.
There is less chance of errors
Because you’re not changing any of the code on a website, which is sometimes risky, it reduces the chance of errors. If you mess up code on a website, it can cost a lot of time and money to fix it, and Google Tag manager reduces this because you can preview something before you make the change.
It’s quick
You won’t miss out on opportunities, data, or sales because implementing a tag no longer requires someone from the IT department to do it. Now, you can do it yourself.
Testing (debugging)
Having Google Tag Manager enables you to fully check and test any tags or changes before you publish without the risk of any of your visitors seeing anything.
Speed up your website
Using Google Tag Manager will speed up your website because it loads separately to your website.
It’s easy to reverse changes you make
If you publish a change, which you later want to remove, it’s easy because Google Tag Manager creates a new version of the container which is archived.
Built in tags
Google Tag Manager has several pre-built tags for you to use for your website including Google Analytics, Adwords conversions, and lots of other third party tags. This means that you can just deploy these tags to your website, without having to edit something or create an entirely new tag from scratch.
Individual user permissions
With GTM you can decide who has editing rights, publishing rights, or viewing rights. This means that you can also give access to an external company if you choose to outsource your Google Tag Management.
Triggers for common actions
GTM has several triggers that are built in so that it’s easier to add tracking to things like clicks or links.
Multiple account support: Multi-account support and user permissions mean agencies can easily use Google Tag Manager to help manage their clients’ tags.
The structure of Google Tag Manager
Google Tag manager can be broken down into five different levels.
- Account
- Container
- Tags
- Triggers
- Variables
The account: This is at the top level of the structure and can include a small company, or a large company with several different websites. An account can have multiple different containers for different websites. For the purposes of this guide, we’ll focus on an account that has only one website.
The container: The container holds all of the tags for an individual website (or app) in one place. You need one container per website or application.
The tag: A small piece of code added to the head or body of your website. This tells Google tag manager what you want it to do.
The trigger: The trigger tells your Google Tag Manager when it should fire the tag. Because each tag has a purpose, there needs to be a trigger to send the information to your chosen third party. All tags need a trigger attached to it, in order for it to work. A trigger can be broken down into events
Variables: There are two types of variables - the ones that Google has built in already (which you can still customise yourself), and user defined variables. To edit a variable when you’re creating a tag, you can click on the lego icon when it appears next to a field.
A trigger needs a variable to figure out whether or not it needs to activate the tag. In order to trigger the tag, it looks at whether the value of the variable matches the conditions. If it’s a match then the tag will fire. Variables can be used on more than one tag - for example, if you set up a variable for Google Analytics, then you don’t need to input your property ID each time you want to use it.
How to set up your Google Tag Manager
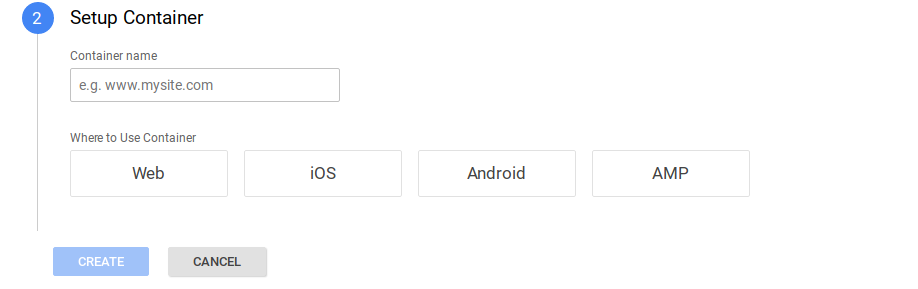
Setting up Google Tag Manager is fairly straightforward - you go to their website and click on sign up. To add a new account you add your business name, and then add your container name in step two and where to use the container.
Once you’ve clicked on Create, it will generate some code that you’ll need to add to your website onto every page of the website in the head of the page, and then some script to add to the body tag. This might mean that you’ll need to ask someone in the IT department to do this if you’re not confident with code, but for the tags you won’t need their help.
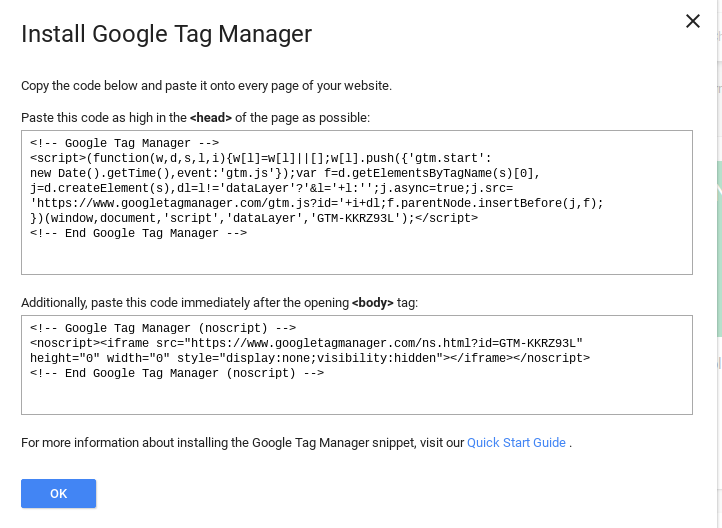
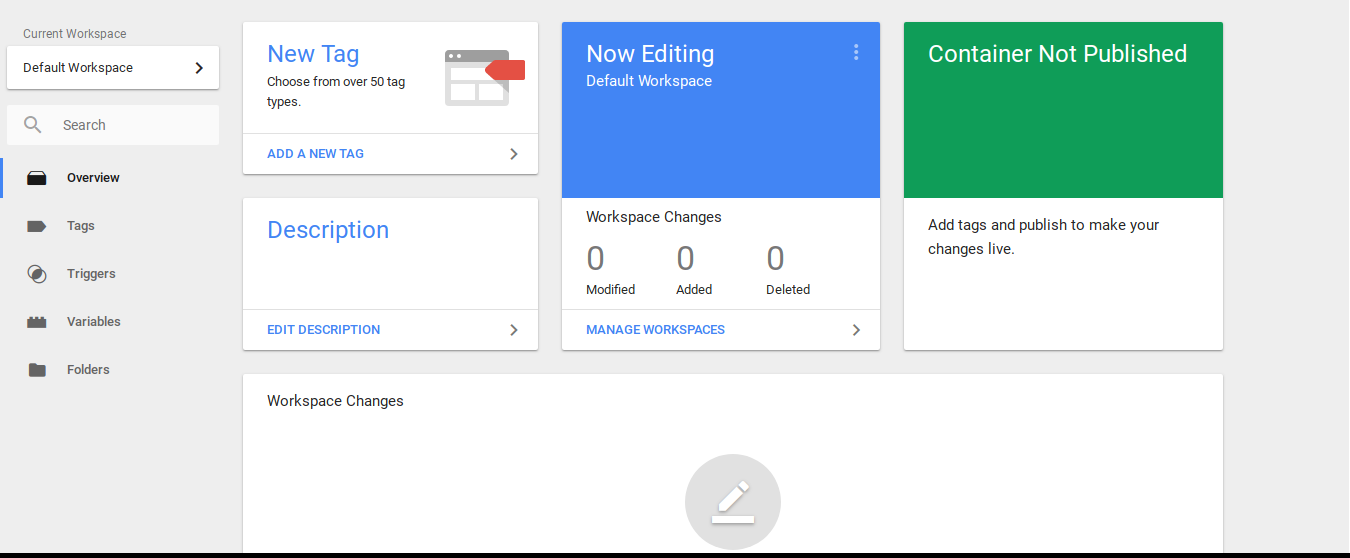
Once you have done this, click on OK, and it will take you to your work space screen.
How to add your Google Analytics pageview tag
Adding your Google Analytics pageview tag should be the first tag that you add, so that whenever you get a pageview, it gets reported in your Google Analytics. This means that the data sets that you get are more useful to you. To do this, you’ll need to click on New Tag in your dashboard.
Note that if you’re already using Google Analytics and are planning to use Google Tag Manager to track your traffic you should remove the Google Analytics tracking code from your website, as Google Tag Manager will be reporting the same thing, which will mean that your data is off.
Labelling your tags
When you’re creating a new tag, it’s important to make sure that you label your tags as clearly as possible so there’s no room for confusion. It’s not good enough to label something ‘ Google Analytics’ Instead you need to be more specific. A good rule of thumb should be Tag Type, detail and location. For example, GA - form submission - contact us, or GA - Pageviews - domainname. This is so that you don’t accidentally edit the wrong thing by mistake, and so that everything is kept in order and is easy to find (for example, if you have multiple GA tags then they will all be listed together, because Tag Manager lists everything alphabetically.)
Once you’ve labelled your tag, then you need to click on the little pen on the right hand side. From there you can select which tag type you want to select.
Tag Types
Google Tag Manager has a list of tag types you can choose from along the right hand side, and includes the option to create a custom tag type.
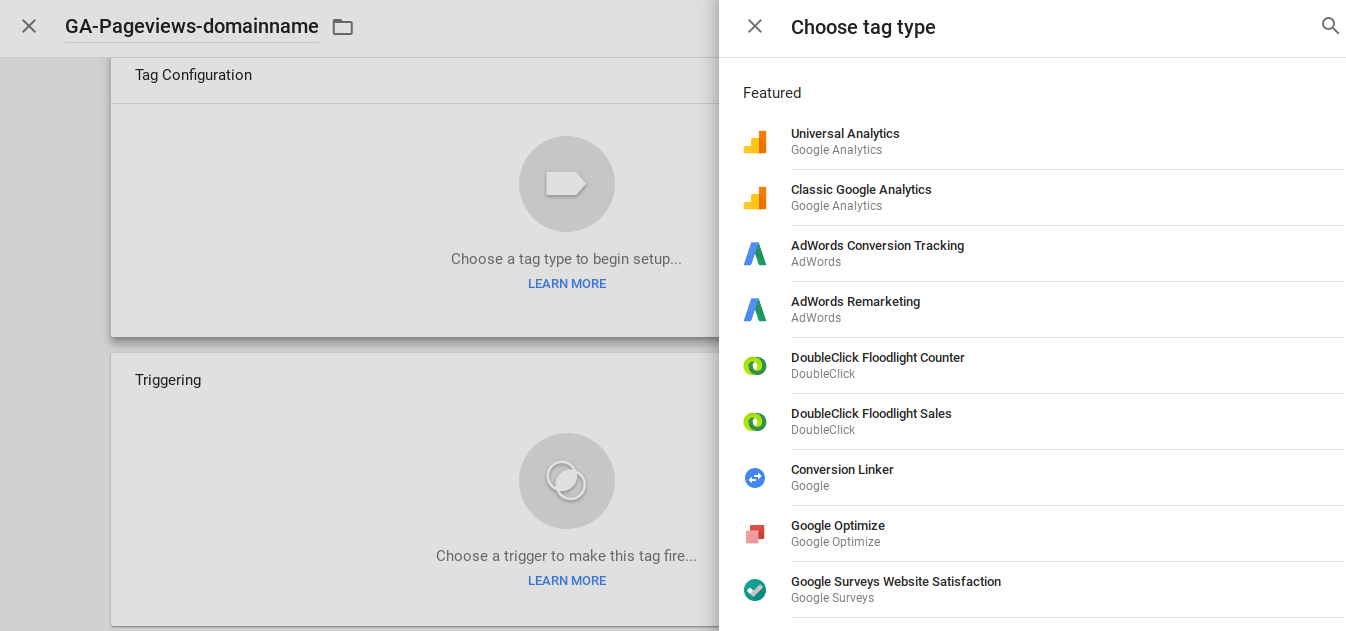
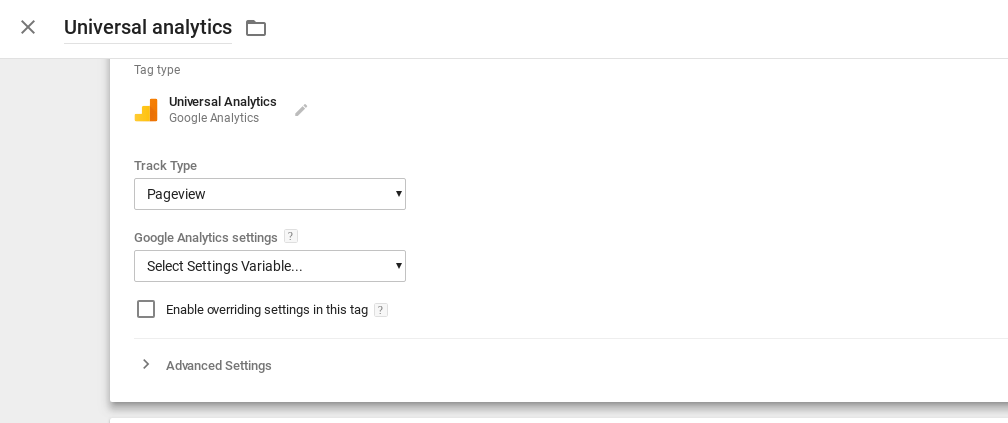
Click on Universal analytics or Classic Google Analytics depending on what you have installed on your website.
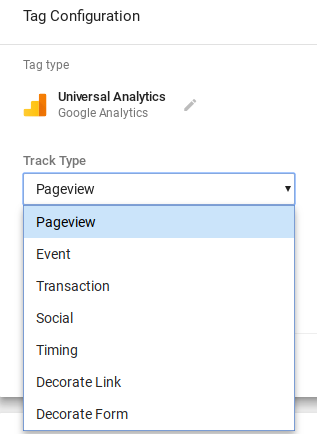
Track types
Track types give you all of the different options on what you want to track. For the purposes of this, we want to select pageviews.
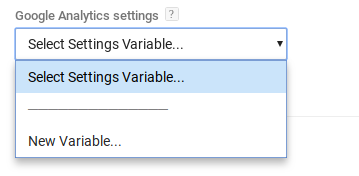
Under the header Google Analytics Settings, you should create a new variable that you can use each time you want a tag created for Universal Analytics to save time and import the information for any other tags using Universal Analytics.
If you tick to enable display advertiser features, then you’ll get more demographic data. It’s a good idea to make sure that your privacy policy is up to date with this, so that people are aware when they are on your website.
Then, you need to decide what the trigger is, and there are plenty of built in triggers already available in the Tag Manager interface. In the case of Universal and Google Analytics, the automatic selection is for pageviews.
 Of course, you can also add your own, or edit this if you’re not interested in pageviews. To change this from pageviews to something else, you can click on the plus button in the top right hand corner.
Click on New Variable. This will mean that you can store your Universal Analytics tracking information for use on a different tag in the future.
Click on the variable type and select Google Analytics
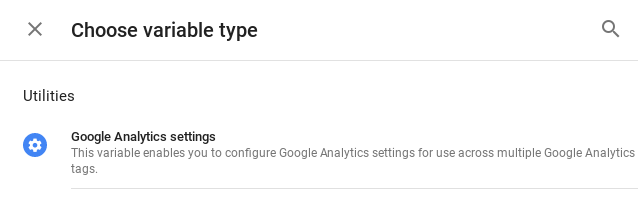
You’ll need to add your Google Analytics tracking ID.
![]()
Once you have added this and clicked on save, you will see that the variable has been added to the Google Analytics settings field.

For each tag, you can enable the overriding settings in the tag if you want to enter a different GA tracking ID, disable, enable or modify any of the settings. In this case, we leave it unticked.
Triggering:
Click on the edit button for the triggering section below the tag and a new screen will come up - there is already a preconfigured page view trigger. Click on it and it will select it.

Click on save - this will add it to your list of workspace changes, but hasn’t published yet.
Debugging
It’s important that you debug your tags to make sure they are working correctly and aren’t causing issues on your site. To do this, once you have created a tag, click on Preview (in the top right hand corner) to check and see whether your tags are working correctly before you publish them. An orange banner will appear at the top of your Google Tag Manager dashboard which enables you to preview your changes to make sure that your tag is working.
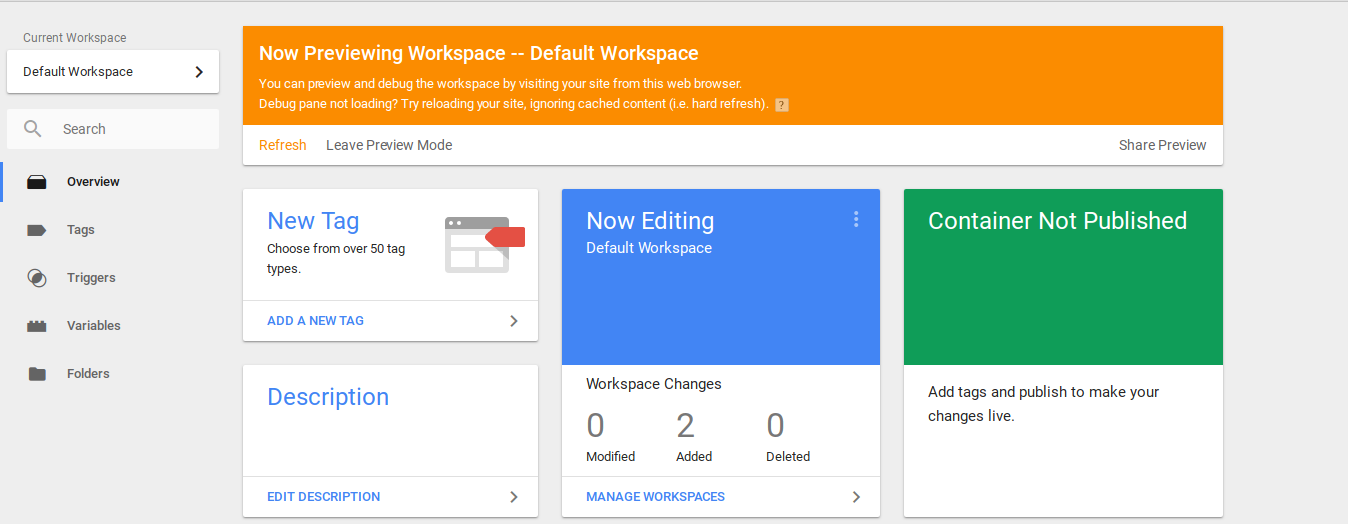
Once you have clicked Preview you will need to go to your website, and a window at the bottom of the page will come up. If you’re already on your website, click on the refresh button to get this screen to show.
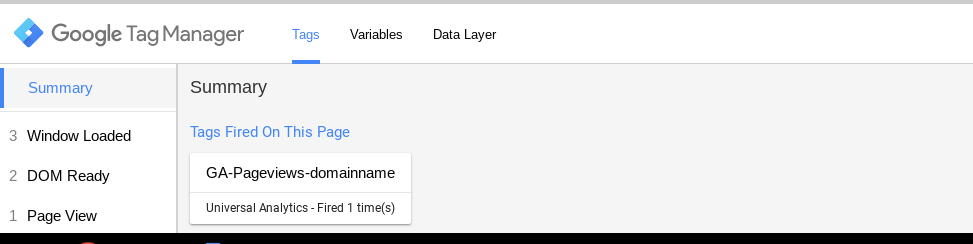
In the example below, it shows that the tag is firing on the page. In the column on the left hand side under summary, it shows all of the events that are happening in that data layer. In order for the tag to be working, you need to see Page View, DOM Ready and Window loaded under the summary section. If any of these are missing then it means that the tag isn’t firing correctly and you need to fix the issue. If there are more than three items under the summary, that’s fine.
You’re the only one that can see any of the information about your tags when you’re in preview and debug mode, but if you do want to share the preview with another team member if there’s a bug that you need to fix, all you need to do is go to the Tag Manager, look at the orange banner and click on Share Preview to get a URL you can send to your colleague.
Google Tag Assistant for debugging
Another great tool for debugging your site is the Google Tag Assistant extension for your browser. Go to your app store and download it to your toolbar. Once you’ve downloaded it, click on the icon in your browser to set it up.
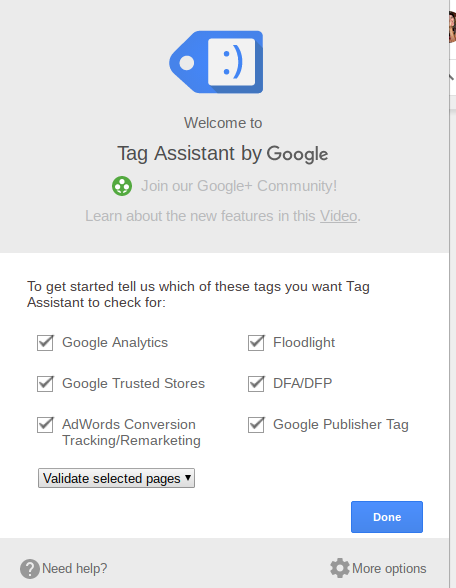
For Tag assistant everything is already automatically selected for you. Click on Done.
In the next screen click enable.
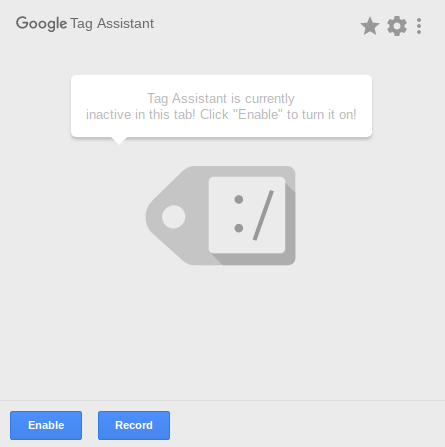
Once you have clicked on enable, you need to refresh your page, and click on the extension again.
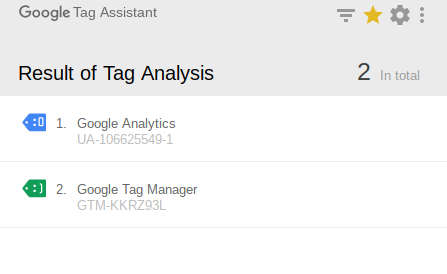
This will bring up a list of tags on your site. If they are green they are working correctly, if they are blue, they have some suggestions for how to improve the tag, and red means that it isn’t working correctly.
In the example below, Google Tag Manager is working correctly, and they have a suggestion for Google Analytics tags.
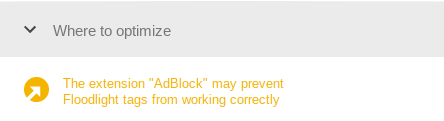
Under the ‘Where to Optimize’ header, it makes suggestions overall. In this case, because AdBlocker is installed.
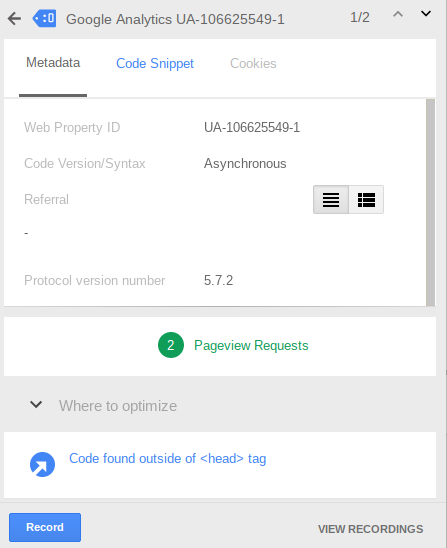
If you click onto the tag in the extension it will give you more information about what you can do to improve a tag. In the example below, it says that code has been found outside of the <head> tag. If you want to optimise this then you can, and it’s a quick, good way to find errors and what you can do about them.
Once you have debugged, you’ll need to publish your container.
Publishing your container
It’s always a good idea to double check in GA that your tag is working in the real time reports section. You should make sure that you haven’t excluded your IP address in your analytics, otherwise you won’t be able to see this in your real time reports. Once you’ve check everything is working, then you can click on Submit changes.
This will bring up a new screen where you will need to write a version name and a description of the changes. This is important to fill out, so if you ever need to revert back, you’ll know what changes you made.
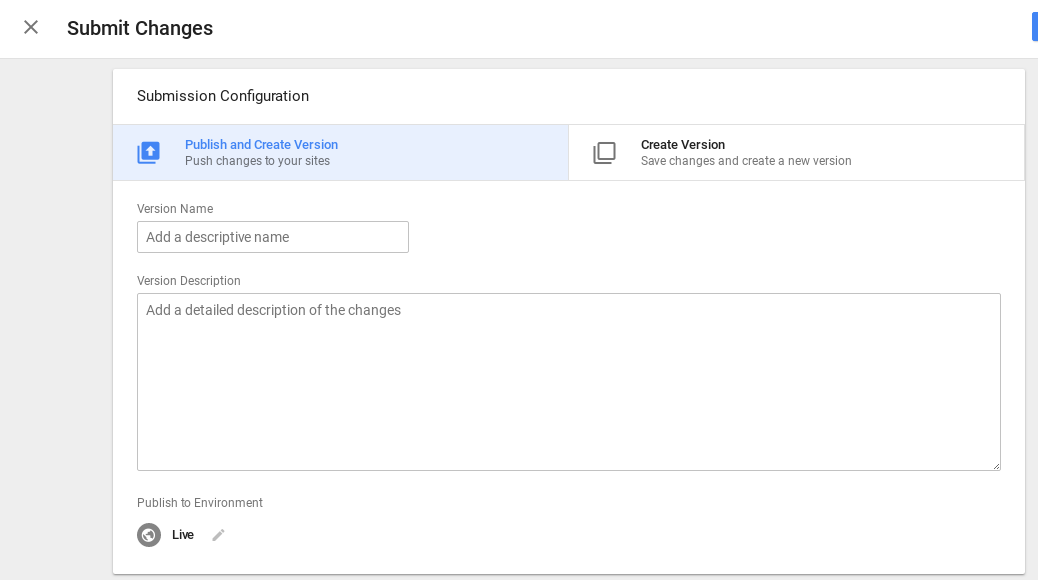
Once you have done this, click on Publish. Congratulations, you’ve added your first tag.
How to report your sales to Google Analytics
Chances are, if you’re an advertiser you’ll want to report your sales to Google Analytics. To do this is a bit more complicated and we have to delve into the data layer. A data layer is a snippet of code on your page that contains information on your variables and values. In order for it to work correctly we recommend that you ask your developer for some help. You can give them the link for tag manager support to help them to implement it.
If you’re using the data layer to assign values to variables, you’ll need to make sure you’re using Google Analytics approved variables so that it reports correctly.
The first thing you’ll need to do is enable eCommerce in your Google Analytics. Then you’ll need to create a Universal Analytics tag with the track type set to transaction. Make sure that you configure your tag the way you want it to work, and when you want the tag to be triggered.
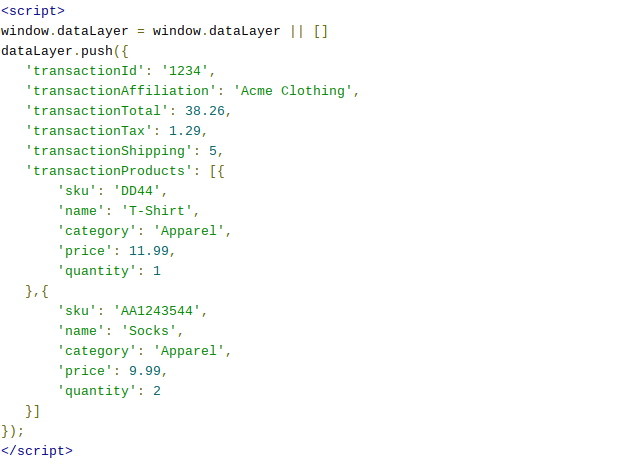
Once this has been done, your developer will need to add the code so that transactions are passed via the data layer. These are the variable names that they will need to use.

Then, your developer will need to create the code, depending on how in depth you want to have your reporting, and add it to the code on your website, above the Google Tag Manager code.
Google Tag Manager support uses this example as a guide for developers:
Advanced eCommerce tracking
Of course, there is the option to add advanced eCommerce tracking which gives you more insight into people’s shopping activity on your site, for example when people add something to their cart, or removing something. Basically you get more data, which can be a lot more useful for you in terms of retargeting. You’ll probably need a developer for this too, depending on your level of coding.
This video explains in detail how to implement this, and a standard eCommerce setup.
<iframe width="560" height="315" src="https://www.youtube.com/embed/ZKjlIhFJMCU" frameborder="0" allow="autoplay
Testing this to make sure it works is important. If you run a few test transactions, you’ll be able to see whether or not the information is coming through correctly in your Google Analytics.
Adding an Adwords tag
If you’re using Google Adwords, then you can track your Google Adwords conversions using tag manager. To do it, you’ll need to make sure that you add the order ID as a value for a data layer variable.
First create a new tag in Google Tag Manager, and select Google Adwords conversion tracking.
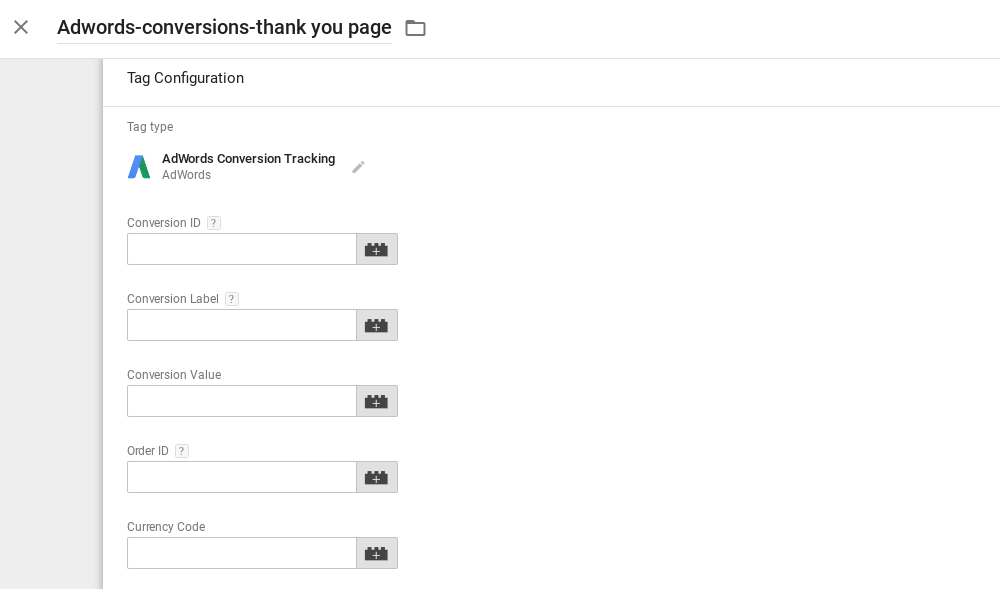
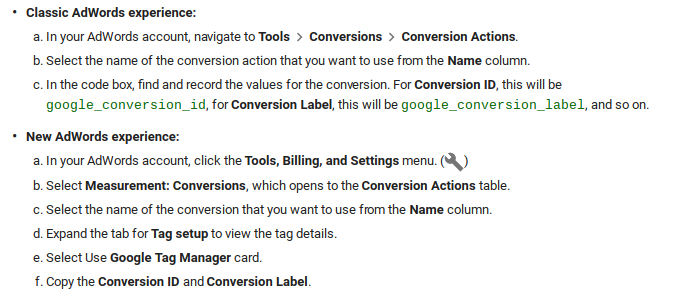
To get your conversion ID and your Conversion label you’ll need to sign in to your Adwords account. These instructions from Tag Manager support tell you how to find these.
Add the information that you got from your Adwords to the tag. You can also add a conversion value, order ID or currency code optionally. If you do, make sure that you use Tag Manager variables wherever they apply.
Choose your trigger to tell the tag when it should fire and click on save. Preview your changes and click on publish when you’re ready.
Note that you’ll need to create a conversion linker tag for this to work correctly as well. See more on Google Tag Manager support.
Adding additional tags
Of course, these tags might not be the only tags that you want to add to your site. There are so many different options, and it depends on exactly what you want your tags to do. If you’re working with an affiliate marketing network, you can use Google Tag Manager to track your affiliate sales. Or, you can set up a tag for your remarketing efforts. There are plenty of Google Tag Manager recipes available online, which you can import into your GTM.
Conclusion
Google Tag Manager is a great addition to any website because it enables you to track your marketing goals more efficiently. It saves time and money, because changes to the website can be made quickly and easily without having to ask a developer every time and you can test the changes before they go live.
It’s ideal for businesses of any size to get more insights, and once you know how to create a tag, you can change and update things depending on what’s working for you. Debugging is an important process for everyone and shouldn’t be overlooked, but once you’ve got it right there is so much you can do. There are recipes available online and several resources that you can use to help get you started with Google Tag Manager.
Extra resources
Google has got a free online course for Google Tag Manager which includes sections on starting with Google Tag Manager, setting up GTM, collecting data using the data layer, variables and events, and using additional tags for marketing and remarketing.
Google Tag Manager support center has a wealth of information on Google Tag Manager and installing tags.
There’s a Google product forum where you can ask questions and find answers to your questions and discuss Google Tag Manager.
Analytics Mania has a list of over 100 different resources in relation to GTM.
LunaMetrics has several different recipes that you can import into your Google Tag Manager.